Before you begin: Find your flow rate.
Time how long it takes to fill a bucket (in seconds) using a 9-litre bucket or bigger. The tap should be the closest one to the water source you plan to connect your irrigation system to. Take any fittings or hoses off the tap and fully open before placing the bucket under tap, with no other taps or valves in use. Make sure you take a flow rate from the front and backyard if you plan on irrigating both areas.
Knowing the pressure is important in an irrigation system but the flow rate (litres/minute) from the water source is more important for a domestic system. If you are unsure on the calculation, then contact or visit us for assistance.
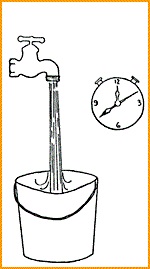
Planning your installation: The first step in laying out your system is to decide which areas you want to water. Use a scaled drawing to plot the outlines of your home and garden areas. Include paths, driveways and patios, and use a tape measure for accuracy. Make sure all areas match the scale of the drawing and label each area according to type of foliage (e.g. lawn, shrubs, hedge, veggies, etc.) Mark the locations of the mains water tap or valve positions. If you plan on using a mains powered controller then mark where the mains power point is located. See below for plan example.
When you have accurately drawn a diagram of your home and garden, email it to us at or bring it into our showroom at 465 Brighton Road, Brighton, South Australia. Please include your contact details in the email, and whether your water source is via pump or mains supply, whether you require manual or automatic, and whether it is to be powered by batteries or mains power. Wi-Fi options Available for mains powered controllers and Bluetooth for battery operated.
We have qualified installers we can recommend or come into the store, and we will go through the design and show you how to use the products.
Checklist
- Flow rate
- Scaled drawing
- Mains or battery powered
- Wi-Fi options for mains powered controllers
- Bluetooth options for battery powered controllers
If you plan to install it yourself, here are a few tips
If you plan on laying concrete or pavers before your irrigation system, then it is crucial to run pipes under the paths. Use at least 25mm blueline poly under your paths that you can connect into later. If you need multiple pipes or cable under your paths or unsure, then run a larger PVC pipe under your paths that can fit multiple pipes.
If the water source is from the mains supply and a new cut-in supply is needed, then consult a licensed plumber about backflow prevention requirements and devices needed. A plumber can also install a new valve or tap to supply water to your new irrigation system.
If digging trenches by hand, soften your soil by watering the ground about two days before you plan to trench your yard.
Check your gas, electricity, telephone and pay TV companies to be sure there are no buried lines where you plan to dig.
Low density poly pipe should only be used between the valves and the sprinklers/drippers. Low density black poly cannot withstand the surge pressure between your service line and valves, and high-pressure blue line poly or PVC pressure pipe must be used.
The tops of pop-up sprinkler heads and rotors should be slightly above the soil surface and no higher. It is much easier to raise a sprinkler than lowering a sprinkler after the system is installed.
The controller/timer
If a power point is available out of weather, a plug-in transformer may be used. Otherwise, weatherproof controllers are available for outdoor use. Irrigation electrical cable must be installed between the mains powered controller and solenoid valves. If this seems impractical then battery operated controllers can be installed.
Please contact us on 08 8377 1135 if you have any question